Saturday, 1 February 2014

Recover files of c: from broken windows

As i told you in previous post,this post will let you learn how to recover the files when operating system crashes.(windows based computer).


This post should help you when something went wrong with your windows and it wont boot up,and you have something precious in your c: drive(precisely %systemdrive%) which you don't wanna lose,while formatting it to reinstall windows.

But before beginning with the process you need to have a bootable USB drive or a DVD with the windows or linux (i prefer linux though,but windows will also do the job.) if you don't know how to make a bootable USB then this link is for you.


If you have a bootable linux then the task is very easy because linux (mint,ubuntu,backtrack,kali,.....etc) comes with a kickass option,Live CD.


Which allows you to directly boot in the linux without installing it in your hard-drive.when you have a bootable linux usb,plug it in your usb port then change the preference of booting from hdd to usb,and reboot your computer.Now your screen should show some option,one of which would be live cd.Choose that,and wait for a minute or two,because this takes more time than the usual boot.once IN, copy/move the content to other partition or drive.


But what to do when you don't have the linux,instead you have bootable windows(windows 7 and 8 are tested don't know about previous versions.) usb/cd drive,No serious problem yet you can backup the files.

how to make a bootable usb

Several time while exploring more about pc,Things go wrong and computer starts crashing,This thing happens a lot when you are learning new tweaks or hacks,
And several times you need to re-install your os, and sometimes you need a bootable drive to that.
To make a bootable dvd, you first have to purchase it.and DVDs sometimes get scratches,which affects its functionality.and now a days about everyone have usb drives.
So these things make a bootable usb preferable over the dvd.
hence this post is dedicated for that.This post is only for

From WINDOWS

  Universal usb installer is a great tool for windows to make a bootable usb drive.
I will prefer it because it won't just help you to make a usb bootable with an OS but it will also help you to create a live cd for several antiviruses, plus it's fast,simple and at the same time it dosen't weighs much(about 1.04mb).It also offers a direct download link to OS's iso if you don't have it(I never used this option,so can't say how effective it is).
After downloading,open the exe it will popup a license agreement READ it and if you agree with it click on I agree,just kidding who the hell cares what is it there in the agreement.But you should read them sometimes specially when the software is paid one and you wanna publish it somewhere.
Now select the distribution from the drop down list,well it says select a linux distribution but windows is there in the list.you will fetch it in the bottom.it consists of three latest windows i.e. vista,7,8(for XP and earlier move to the cmd method).
Now browse for the iso file choose the dirve(make sure you're selecting the write drive,double check drive letter from explorer).
After all the tweaking click on create.Time taken depends on the size of the iso and your usb data transfer rate.
  cmd method : cmd can only make a bootable windows drive.And as cmd is offerred by windows you can understand why i said that only for and by the windows.

  • format the drive in ntfs format either the way you used to do or via cmd using diskpart(make sure to do a complete format,quick format won't here.)
  • extract the iso file using winrar or any iso extractor or mounter somewhere.
  • open the command prompt WITH ADMINISTRATOR RIGHTS
  • Type bootsect /nt60  drive_letter:

  • if this doesn't work then type cd location_where_you_extarcted_iso/boot/
  • Then type bootsect.exe /nt60 usb_drive: and you're screen should look something like this(if working in windows 8 alot like this).

  • Then copy the entire extracted files in the USB drive in which you have written the boot sector.


From LINUX

Under this section you will get three conditions.
  1. To make a bootable linux drive from a GUI application.
  2. To make a bootable linux drive from terminal.
  3. To make a bootable windows drive.
so let's start with the first conditions
Some linux distro has a inbuilt gui based application to get the job done,like mint has(i used linux mint 15 and 16 desktop version and they both have it,Don't know about previous version of this distro).well i don't think that a linux user is so dumb that it will need a guide to use that application.So i'm not going to get over the process,But if you're a novice to linux you can comment to ask your question. So,what if there is no such thing pre_installed,nothing you just have to get it installed. you can download unetbootin from here.
After downloading move to the folder where it is. Then right click in the folder (not over unetbootin and not over any other file). then you will get a option titled with "Open in Terminal" hit it you will get a terminal like this.(if this ain't work you,try cd command it surely will.)


Then type "sudo chmod +x unet" and hit TAB to autocomplete it if the autocomplete doesn't work that means you have more than one file in the same directory with the same name,until that last letter you typed so type some more letters,at the end your terminal should say "sudo chmod +x unetbootin-linux-585",if it does then hit enter.. it will prompt you for admin password enter the password and hit enter again.
Then type "./unetbootin-linux-585" and hit enter (don't forget to use that TAB button.) and now your screen should look like this. and from here you can do it on your own.(But if can't,you can let me know that via comment box sitting below)

Well you should get that window of UNetbootin poped up by now,but if for some reason this don't get right.you can try installing UNetbootin via repository.
To add repository and install it from there,open your terminal,and Type the following.
    sudo add-apt-repository ppa:gezakovacs/ppa sudo apt-get update sudo apt-get install unetbootin sudo unetbootin

Now the second condition totally cmd method Open your terminal cause this is the second method. Type the following in the terminal
sudo -i
fdisk -l (note your usb drive letter from here it would be like sdb1,sdc1,sdb2,sdc2....)
sudo umount /dev/sdbx (now replae the x and b accordingly.See the image below for reference.)
sudo dd if=/path/to/linux.iso of=/dev/sdbx bs=1M

ref

To make a windows bootable usb from linux you need program called winusb.To install that open terminal and type
sudo add-apt-repository ppa:colingille/freshlight
sudo apt-get update
sudo apt-get install winusb
Then open the.......(now,you know what to do,right??),
        

You should always make a bootable USB before trying new tweaks because when you mess the things up,then too you have a way to recover.
Meet you soon and in next post I will gonna tell you how to recover the files when you already messed up the PC.
Till then LIVE,BREATHE and BLOG...;)

Friday, 24 January 2014

What is Host file

Host file is a computer file used by operating system for the mapping of hostnames to IP addresses of the DNS servers.The host file is a plain text file,and is conventionally named hosts.

The file contains lines of text containing IP address followed by hostnames with a space or tab in the beginning of the hostname.The hostname infront of the i.p address is the i.p with which it is mapped/linked.
So when any application in the system searches for that particular host name what they get as the result is the i.p along with it in host file.

In simple language when you open your web browser like google chrome,which is an application and you type www.google.com in your address bar your system asks for the i.p address of the DNS server which is linked to that domain name(or hostname).

Browsers follow such steps because www.google.com is not place or address where the browser can land . google.com is only a kind of cascading which encloses the i.p. address,this cascading is applied to make it simpler to remember.like,google.com is a way simpler than this 74.125.236.41 to remember.Hence you can access google.com by entering the i.p. address,even.

location of this so called host file varies with the operating system,but the name of which is "hosts" doesn't remain the same in every single operating system

location of host for windows based system is "C:\Windows\System32\Drivers\etc" whereas this file is loacted in "/etc/" in linux systems and for androids path is "/system/etc/"

A host file when opened with a text editor will look like this.


The hashed (#) line are just comments and contribute nothing in working.


With the help of host file anyone can block and redirect the traffic from the intended destination to sites hosting unwanted or malicious contents.Hence,There is always a risks on this file to be hijacked and attacked by trojans,malwares,and viruses.

For eg : A widespread computer worm Mydoom.B blocked users from visiting sites about computer security and antivirus software and also affected access to Microsoft Windows and Antivirus Update websites.

Due to which the victim can't able to know and detect the presence of malware in their system,and hence become more prone to other virus and malwares.

If you are thinking there only cons of this files,then you are wrong.This can helps the you to test your site offline,with desired domain name. Isn't this cool.

You can use it to block various malicious sites..
Even some cracks uses this method to counterfeit the genuinity check of softwares by blocking a particular website.

You can also play pranks on your friends by diverting facebook to google and google to facebook,using host file.

But this blocking can be easily bypassed by a proxy server.

This host file can also be used to make effective local phishing pages.

So wait for my upcoming post if you wanna know about how some hackers uses this property to create a local phishing page.


ok bye,for now.But,keep blogging.

Tuesday, 21 January 2014

create a playlist

Playlist as you know is the organized/sequential playing of a video or audio track.
for a music lover playlist are someone their girlfriend(s)/boyfriend(s).
This blog will help two major groups of people.
    • The extreme music lovers.
    • One who uses their computers as a media players only.
  1. The GEEKS.(who reads this kinds of posts,to either kill there time or to tighten there grip over the computing world)
It's so because In this post you'll learn how to create a easy to make universal playlist.(here universal playlist means the playlist which works with most of the media players out there.neglecting some exceptions,because exceptions are every where.)
To create a universal playlist you have to fulfill all these needs
  • A computer with working electricity supply
  • Internet connection to read this post.
  • Media files
  • Media player
  • Notepad or similar kind of text editor.
  • and the most important A BRAIN
All ok, lets do it...
  • Open notepad
  • Type the location of the file/files,it can be any music or video file.
  • Hit enter and type the location of second file.
  • Hit enter and type the loca..... until you're done adding the files
  • Then Save it as "anything.m3u" to a desired loaction. All done
HERE IS A TIP: If you are saving the ".m3u" file in the directory where your media files are then you don't need to type the whole location i.e,if your media is on "E:\something\otherthing\media\" directory and you're saving the ".m3u" file in same directory then you can just write "song.mp3" and "video.mp4",you don't have to type "E:\something\otherthing\media\song.mp3",but if you're the playlist in your desktop then you have to type the whole "E:\something\otherthing\media\song.mp3" to get the things working. ANOTHER TIP:You can also create a text file then type whole of the shit and changing the extensions to .m3u.


 Here comes The GEEKY WAY:Beware,non-geekers trespass this line and you will loose your mental stability
  • Open the command prompt ("no smiles please")
  • Type E: if you want to move to the E:\ drive
  • Type "cd something\otherthing\media\" or the directory you want to save the playlist to.
  • Type "(echo 1st_filename.mp3&echo 2nd_filename.mp3 &echo nth_filename.mp3) >playlist.m3u"
This geeky way is not for the linuxers because linux jumbles the order.People (like me) with dual boot pc's with windows and linux should have to make to separte playlist if they are not saving it in the directory where the files are.
Well there is a SUPER GEEKY WAY to do the job but i'm skipping it for the sake of the humanity.
Ok then enjoy,will be back with something new..soon...
Till then LIVE,BREATHE,and BLOG ;)

Secrets of.. VLC

secrets of vlc
"VLC is a free and open source cross-platform multimedia player and framework of VideoLAN that plays most of the multimedia files as well as DVD, Audio CD, VCDs" That's all you(most of you) know about vlc.But vlc is loaded with more useful and cool stuffs.Today this is the topic of our conversation.You will get to know about some uncommon features of vlc that you may not have known before ,like screen capture,video conversion,streaming....and many more.Just scroll down and find out.

Capture your screen

    No need to download any screen recording application if you have vlc installed,Because vlc can record your screen and help you save it in desired format.Here's how to do it
  • Press "ctrl+R" or navigate to "Media" > "Convert/Save.."
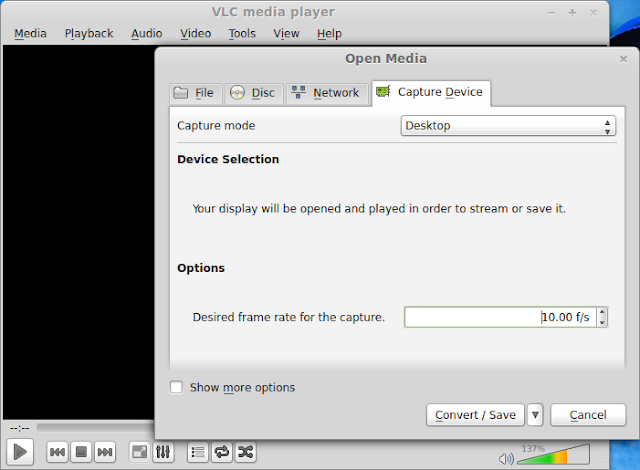
  • A window will pop up.Goto Capture Device,then select "Desktop" in "Capture mode" option and enter Desired frame rate for the capture in the option.And click on Convert/Save.
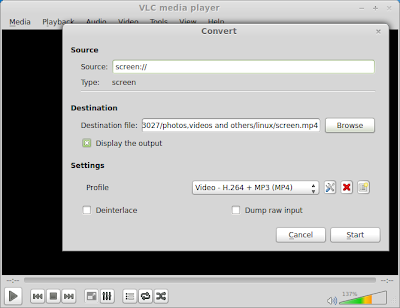
  • Another window will pop up,titled Convert.Browse and choose destination enter the file name with extension and click on Save.Check "Display the output" checkbox.Then click on the settings icon.
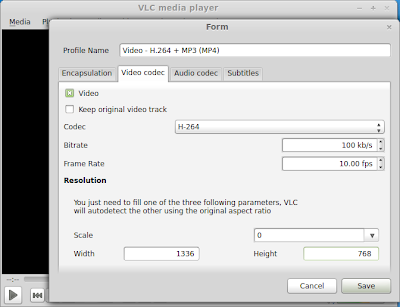
  • Choose codec,fill in the Bitrate,Frame Rate,and Height and Width.Click on Save
  • Hit Start when Ready.Minimize the vlc and you're done.To stop and save recording click on the stop button form vlc's UI.
The recorded video will be saved in the chosen directory. If you are not satisfied with the video quality Try increasing the Bitrate.

Convert media from one codec to another

    It may be your another media conversion option.But i will not the prefer converting the videos from vlc cause sometimes other media players can't play the converted videos.But anyway,Lets start.
  • Press "ctrl+R"
  • Click on "Add..." button,Browse and select the file.And click on Convert/Save.
  • Browse for destination where the converted file is to be saved.name the file with Extension.
  • Choose the profile then click on the settings icon and adjust the bitrate choose codec and modify the height and width if you want to.
  • Then click on save and then on Start


Stream and download on-line videos

    Media streaming is just another option of vlc.Not just you can view on-line videos but also download them,through vlc. To view :
  • Press "ctrl+S" to pop-out "Stream..." window.
  • Goto Network tab
  • Enter the URL click on "Stream"
Now you you're thinking,Why to watch the videos in vlc when we can watch it in any browser.But some browser needs to install adobe flash player.And are not as flexible as vlc,It give gives the same options for on-line videos as for the videos in your HDD or in your USB.
Now the question is how to download them. So to download open up your vlc and..
  • Press "ctrl+R" and move to Network tab.
  • Enter the URL there and click on "Convert and Save" button
  • Browse the destination where you have to save it,give it a nice name with extension.
  • Choose the settings from profile pane and select the video resolution,frame rate,bitrate,format...etc.
  • Click on "Save" and then on "Start"
Done !!! your video will be saved in the chosen directory.


Play videos in ASCII

Barely useful but a piece of art.You may have seen some pictures in which some kind of skull or message is displayed which is made of letters and numbers.You can also do it playing any video or image on vlc in ASCII and taking a Snapshot of it.
To play a video in ASCII via vlc.Follow the underneath steps.
  • Press "ctrl+P" to bring up the preferences pane.
  • Click on video tab, Then change the output from "Default" to "ASCII-art video output".Click on save.
  • Then drag and drop any media file on vlc
Don't forget to change the output mode from "ASCII-art video output" to "Default", to view the videos in original form.


Play a video puzzle

You have played many still puzzles but have ever played a video puzzle??...Now you can vlc will help you do that.

  • Open any video,pause it.
  • Press "ctrl+E" or move to "Tools" > "Effects and Filters".
  • Navigate to "Video Effects">"Geometry".Click on the checkbox named "Puzzle game".
  • Press resume,Enjoy.

Zoom-in a video

You can zoom in and out a playing video in vlc by following this method
  • Open any video,pause it.
  • Press "ctrl+E" or move to "Tools"&>"Effects and Filters".
  • Navigate to "Video Effects">"Geometry".Click on the checkbox named "Interactive zoom".
  • Select zoom level from level selector bar in the left hand side and select the zoomed portion through a preview pane just above it.

Some other options

VLC is loaded with other tons of options and features,like cropping video,video in negative,rotate the video upto 360o,Add your logo,or hide any predefined logo,Add various Effects,Synchronize video,audio,subtitles.
You will find all these settings in "Effects and Filters" under "Tools" in Menu. or simply press "ctrl+E". play the around the interface and you will find the options.
Now think what a piece of art and money is vlc and VideoLAN is providing it for free.If you wanna support or encourage them you can Donate money to VideoLAN

Any question just comment here or msg me in my facebook profile.
Till then LIVE,BREATHE and BLOG. ;D

Tuesday, 31 December 2013

How to make your keyboard an animal

This post is just for windows users.linux and mac support is not a guarantee.But this is not the truth  that you can never use this program in other os. Google the support and you will find out the solution.
Anyway windows user proceed,which i know are abandoned.
Type this in notepad save it as anything.vbs
Run this vbs program..
Done.. look at your keyboard lights.....

Set wshShell =wscript.CreateObject("WScript.Shell")
do
wshshell.sendkeys "{CAPSLOCK}"
wscript.sleep 50
wshshell.sendkeys "{NUMLOCK}"
wscript.sleep 50
wshshell.sendkeys "{SCROLLLOCK}"
loop

To stop these or cease the program to execute further.
you have to kill wscript.exe titled process
To do that you can use the traditional method  i.e. using taskmanager

But if you wanna fell pro or just wanna kick the ass of that mouse lying there in the desk,you can try the cmd method.
so do that.
press WIN+R
type cmd in the run dialog box that appear and when you land on the cmd type taskkill /f /im wscript.exe and hit enter.
There you go,Now you look like an elite(well using just keyboard to do the job will make you look elite for sure in the eyes of noobie.)


You can also try replacing the "{CAPSLOCK}"  and .... to some thing like "i love itworld01.bogspot.com" then your computer will type this everywhere and every time until you ki........

Tuesday, 24 December 2013

make a talking program

Dim msg, sapi
Dim ch
do
msg=InputBox("Type what you want to listen","Talk it","TYPE IT HERE")
Set sapi=CreateObject("sapi.spvoice")
sapi.Speak msg
ch=InputBox("TYPE y TO CONTINUE USING THIS SOFTWARE TYPE ANYTHING FOLLOWED BY ENTER ELSE TYPE NOTHING JUST ENTER","TALK IT")
Loop Until ch = y

Type the whole bunch of code in notepad or just copy it there,this is what i think you'll prefer...
save it as anything.vbs...
Run the script....
there you go you just made your own talking program...

for more similar programs visit my friend's blog you can also follow me on facebook

Bonus: A tip for you to use while you are use vbs script to program something..
To halt an infinitely running program use the command "taskkill -f -im wscript.exe",
Better to make a batch program with the above command..
To do that open notepad type the command mentioned above i.e., "taskkill -f -im wscript.exe" without quotes and then save it as something.bat then run this program(I fell kinda weird to call it a program.=_=) whenever you fell like your program is running upto infinity...
For more tips on how to create more fun vbs programs keep connected to the blog..
You can also like our facebook page to get the regular updates